Indications
- Suspected CNS infection
- Suspected subarachnoid hemorrhage
- Therapeutic reduction of cerebrospinal fluid (CSF) pressure
- Sampling of CSF for any other reason
Contraindications
- Local skin infections over proposed puncture site (absolute contraindication)
- Raised intracranial pressure (ICP); exception is pseudotumor cerebri
- Suspected spinal cord mass or intracranial mass lesion (based on lateralizing neurological findings or papilledema)
- Uncontrolled bleeding diathesis
- Spinal column deformities (may require fluoroscopic assistance)
- Lack of patient cooperation
Materials
- Lumbar puncture tray (to include 20 or 22 gauge Quinke needle with stylet, prep solution, manometer, drapes, tubes, and local anesthetic)
- Universal precautions materials
Pre-procedure patient education
- Obtain informed consent
- Inform patient of possibility of complications (bleeding, persistent headache, infection) and their treatment
- Explain the major steps of the procedure, positioning, and postpocedure care
Procedure
- Assess indications for procedure and obtain informed consent as appropriate
- Provide necessary analgesia and/or sedation as required
- Position patient: lateral decubitus position with “fetal ball” curling up, or seated and leaning over a table top; both these positions will open up the interspinous spaces (see Figure 1)
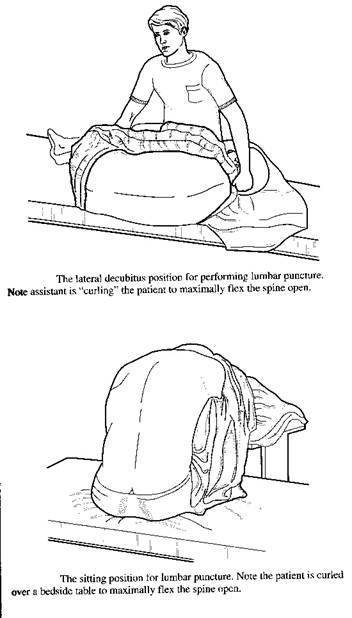
Figure 1: Positioning patient for lumbar puncture
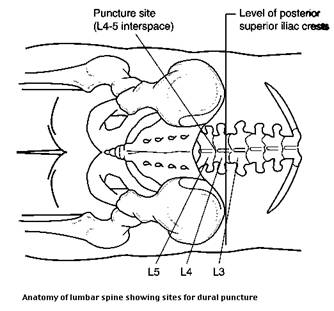
- Locate landmarks: between spinous processes at L4-5, L3-4, or L2-3 levels (see Figure 2). On obese patients, find the sacral promontory; the end of this structure marks the L5-S1 interspace. Use this reference to locate L4-5 for the entry point. You will aim the needle towards the navel.
Figure 2. Anatomy of lumbar spine
- Prep and drape the area after identifying landmarks. Use lidocaine 1% with or without epinephrine to anesthetize the skin and the deeper tissues under the insertion site
- Assemble needle and manometer. Attach the 3-way stopcock to manometer
- Insert Quinke needle bevel-up through the skin and advance through the deeper tissues. A slight pop or give is felt when the dura is punctured. Angle of insertion is on a slightly cephalad angle, between the vertebra (Figure 3). If you hit bone, partially withdraw the needle, reposition, and re-advance
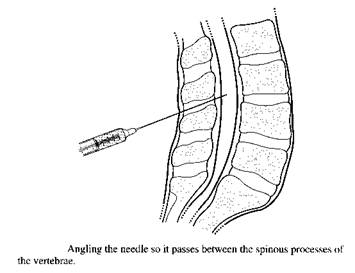
Figure 3
- When CSF flows, attach the 3-way stopcock and manometer. Measure ICP…this should be 20 cm or less. Note that the pressure reading is not reliable if the patient is in the sitting position
- If CSF does not flow, or you hit bone, withdraw needle partially, recheck landmarks, and re-advance
- Once the ICP has been recorded, remove the 3-way stopcock, and begin filling collection tubes 1-4 with 1-2 ml of CSF each
Tube 1: glucose, protein, protein electrophoresis
Tube 2: Gram’s stain, bacterial and viral cultures
Tube 3: cell count and differential
Tube 4: reserve tube for any special tests
- After tap, remove needle, and place a bandage over the puncture site. Instruct patient to remain lying down for 1-2 hours before getting up
NOTES:
- Insertion of the needle bevel-up minimizes dural trauma
- A traumatic “bloody tap” occurs when a spinal venous plexus is penetrated. Often the fluid will clear as succeeding tubes are filled. Spin down the first tube: if red blood cells have been in the spinal fluid for some time (for example, subarachnoid hemorrhage), xanthochromia will be present in the supernatant fluid. If the fluid is clear after it is spun down, the tap was only traumatic
- In some cases, conscious sedation is helpful in reducing patient anxiety and allowing maximal spinal flexion
COMPLICATIONS, PREVENTION, AND MANAGEMENT
| Complication | Prevention | Management |
| Bleeding from puncture site post-tap | None
|
Local pressure |
| Bloody spinal fluid
|
None
|
Withdraw needle and perform tap at interspace either above or below |
| Infection
|
Do not perform tap through infected skin
Use sterile technique |
Antibiotics
|
| Post-tap persisting headache
|
Use pencil-tipped needle if possible; insert needle bevel-up | Post-procedure epidural blood patch by anesthesia consultant |
Documentation in the medical record
Include in your note a brief history and physical examination of the patient, the reasons for performing the lumbar puncture, and consent. Note in particular a brief examination of the cranial nerves, presence or absence of papilledema, or any other lateralizing neurological finding. Also include a brief note of examination of the patient’s spine with attention to any obvious spinal deformity.
Document position of patient during the procedure, opening pressure, and clarity/color of the CSF. Once results of the CSF analysis are available, they can be appended to your note.
NORMAL CSF VALUES
| Parameter | Normal Values |
| Protein | 15-45 mg/dl |
| Glucose | 50-80 mg/dl |
| WBC | < 5 mm3 |
| RBC | 0-5 |
| Opening pressure | 5-20 cm |
| Clarity, color | Clear and colorless |
Items for evaluation of person learning this procedure
- Anatomy of lumbar spine
- Indications of procedure
- Contraindications for procedure
- Interaction between physician, staff, patient, and/or family
- Sterile technique, universal precautions
- Technical ability
- Appropriate documentation
- Understanding of potential complications and their correction